Running Scenario Manager
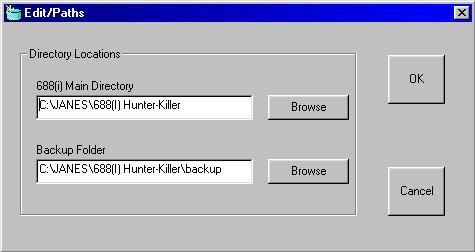
The first time you run Scenario Manager it will prompt you for the paths to both your main 688i installation and the location that you want to keep the 'Backup' sets of scenarios. The program queries the registry, and if it finds your installation of 688i it will fill in the text boxes with the information found in the registry. If the information is correct you simply need to accept the paths by clicking OK and confirming.
Important The first thing that you want to do is to backup your current scenario folder so that you can always restore them. Click Backup on the meny bar and select Current Missions. On the backup form, select Backup to New Location. It will now prompt you for a name to call the backup set that you are creating. Call it 'MyBackup' and click OK. It will then tell you that you sucessfully copies xx number of files to your backup location.

You can now begin to divide up your scenario folder into much smaller folders. Manually confirm that Scenario Manager copy your scenarios into your backup folder. Open Windows Explorer and navigate to your main 688i folder. If you selected the suggested file locations earlier you will see an additional folder called 'Backup' in your main 688i folder. (If you selected another location you will have to navigate to that location to find your Backup scenarios.) Open the Backup folder and you will see your newly created folder called MyBackup. In that folder will be the Scenario folder with all of your original scenarios. Using your Windows Explorer you can simply erase all of the scenarios in your main scenario folder. Do not erase the file called a.cdf
If you installed the supplied ScenarioManagerDirs.zip file then much of this has already been done for you. This zip file contains all of the original scenarios, categorized, and creates all of the directories for you, so much of the following is not necessary.
Now, lets get all of the Campaigns and from your backup folder and copy them to your main scenario folder. The campaign scenarios all have the file extention .scn
Once you have moved all of the campaign scenarios to the working scenario folder we can then back them up into a Backup folder called Campaign. Follow the procedures above to backup your campaigns to a new location called 'Campaigns'.
You can do the same thing for the single missions with the extention .scu and the multiplayer missions with the extention .scm Remember to never erase the file a.cdf as it is necessary fo the game to run.
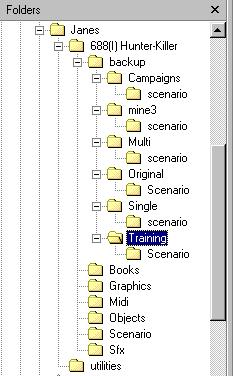
You can easily create these folders by hand using the Windows Explorer. The directory is easy to create and you can copy scenario file by simply click and dragging. Be sure and copy, and never to move the files. The simple directory tree is shown.

Once you have your original scenarios broken down into sub folders you may easily have a directory structure like my own.
Now that you have your directory all set up, to install one set of scenarios all you need to do is select that set in the drop down list box and confirm. You can then even start 688i from the main Scenario Manager screen.